If you are using an iOS device, you are well aware of the fact that you cannot Transfer File From iPhone to Mac like you would do from Android to your Windows Device. Moreover, there are strict restrictions on how and where you can receive files on your iOS device. These restrictions are intended for user data protection. But there are fairly easy methods of transferring files between your iOS devices i.e from your iPhone to Mac. And yes there is more than one way to share files.
Using AirDrop to Transfer File From iPhone to Mac
Recommended Reading: How To Control Your Phone Usage With Apple’s Screen Time
With AirDrop, you can instantly share your photos, videos, documents, and more with other Apple devices that are nearby.
Before you begin, check the following:
- Make sure that the device you’re sending to is nearby and within Bluetooth and Wi-Fi range.
- Check that you and the device you’re sending to have Wi-Fi and Bluetooth turned on. If either of you has Personal Hotspot on, turn it off.
- Check if the device you’re sending to has its AirDrop set to receive from Contacts Only. If they do, and you’re in their Contacts, it needs to have your email address or mobile number in your contact card for AirDrop to work.
- If you’re not in its Contacts, have it set its AirDrop receiving setting to Everyone in order to receive the file.
Once you are all set to start transferring files, follow the below steps.
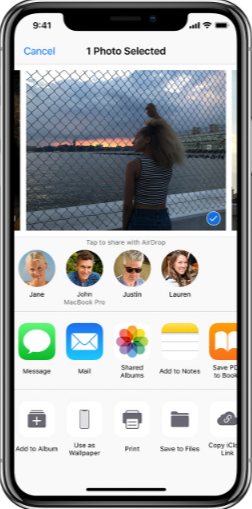
- Open an app on your iPhone, tap Share or
 . If you share a photo from the Photos app, you can swipe left or right and select multiple photos.
 - Tap the AirDrop user that you want to share content with.
Using iCloud Drive to Share File From iPhone to Mac
iCloud Drive lets you securely access all of your documents from your iPhone, iPad, iPod touch, Mac, and Windows PC. So no matter which device you’re using, you always have the most up to date documents when you need them.
Using iCloud Drive you can create new files and folders from iCloud-enabled apps and keep them up-to-date. Moreover, you can work on the same file across multiple apps. There are a few prerequisites before you can start using iCloud Drive. First of all, make sure to update your iPhone, iPad, or iPod touch to the latest iOS and your Mac to the latest macOS. Secondly, make sure that you’re signed in to iCloud with the same Apple ID on all of your devices. Moreover, you can also share files between your iOS/Mac and Windows using iCloud Drive. To share files with your Windows PC, update to Windows 7 or later and download iCloud for Windows.
How do I access my files in iCloud Drive?
There are multiple ways you can access your files in iCloud Drive:
- Using any supported web browser, you can use iCloud Drive at iCloud.com.
- On your Mac, you can go to iCloud Drive in Finder.
- On your iPhone, iPad, or iPod touch with iOS 11 or later, you can access your files from the Files app. On iOS 9 or iOS 10, you can access them from the iCloud Drive app.
- On your PC with Windows 7 or later and iCloud for Windows, you can go to iCloud Drive in File Explorer.
Wrap Up!
The only limitation with iCloud Drive is you can store any type of file in iCloud Drive, as long as it’s 50GB or less in size and you don’t exceed your iCloud storage limit. That means you can keep all of your work documents, school projects, presentations, and more up to date across all of your devices.
![Read more about the article [Tutorial] How To Turn Off Split Screen on iPhone 6 Plus/6S Plus](https://thetechjournal.com/wp-content/uploads/2016/06/chrome_2016-06-27_10-01-18.jpg)